
5 Minute Portrait Preview - 5 Tips for Better Portraits
I get asked quite often at events to take portraits of people. Usually someone needs an image for their web site, product or even profile picture for linkedin and Facebook.
This is where I came up with the 5 minute portrait idea. In all honesty I usually spend that amount of time capturing a few different looks for the subject and as soon as I get that killer shot we wrap it up.
You will see that you wont always be shooting in the best environments but you should be able to find a cool location to photograph. With Janice aka Mommy Blogger we pretty much shot her photos in a parking lot that so happened to have a small lot of tress. Win’s photos were taken in a long hallway at a Las Vegas hotel that had 100 yards of floor to celling windows. You will be able to find good places to shoot where ever you are.
This is a preview post for the 5 min portrait which I will capture video and audio of me directing and capturing the photos. You will get to see how I interact with the subjects and get a feel for how I get them to relax as well as pose. In the end we will have a nice selection of images to process and than deliver.
Click more to get 5 Tips for Better Portraits.

5 Tips for Better Portraits
1. When trying your own 5 minute portrait session remember my “Step” rule. Start a little wider, than either zoom in or walk in to start to get a tighter shot where you fully fill the frame. You can see that in some of the photos of Wins where it starts of wider and ends up with a full on tight head shot. I suggest doing this over shooting wide and than cropping.
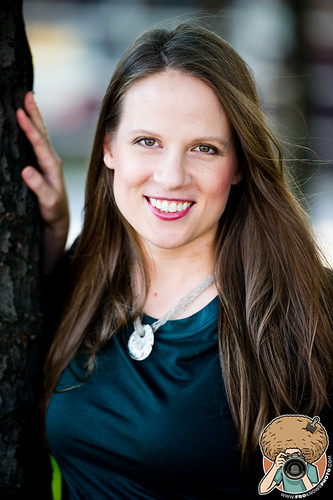
2. Find a locaiton with a nice background. A key here is finding a “DEEP” background which will allow you to get the nice out of focus areas in the background of your images. For example if you shoot in a very long hallway the walls in the background along the side will frame your subject very well. Look for backgrounds that wont have huge distractions like power lines or other objects that could distract.
3. Use a smaller depth of field with a longer lens. The longer lens will help you compress the background and help separate your subject. The smaller depth of field which you can control with your F stop will make your subject pop against the background. You can achieve these results with just about any lens, just remember to shoot it at its widest F-Stop.
4. Focus on the EYES – There is nothing more important to me than getting the Focus tack sharp on the eyes. I tend to lock my focus in on the eye that is closest to the camera. Remember to shoot these images on single focus and not continues. This way you can lock the focus right where you want it without it shifting and missing. A portrait with the nose in focus but the eyes out is not a keeper.
5. Posing – Try not to have your subjects stand broad shouldered especially woman. Have them slightly turn their shoulder towards you which will help slim subjects as well as create an interesting angle. I tend to ask my subjects to lower their chins slightly which will bring their eyes up to the camera giving you that really nice big eye look. It is about relaxing your subject, if they look tens the images tend not to work.
Just go out there and have fun, try different angles, fill the frame, focus on the eyes and get your subject to relax. You as the photographer need to direct your subject because they are looking to you for direction.