

Lightroom Exporting, Adding Borders and Data
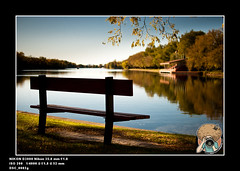 There are a few steps to get a photo looking like this and its easier than you think. Lightroom, along with a great plugin, will give you tons of options and control over your exported photos.
- Download and install ImageMagick (Windows only, Mac’s already have this installed).
- Purchase the LR2Mogrify plugin from Photographer’s Toolbox.
- Install and enable the plugin via the Lightroom Plugin Manager.
- Go to File, Export, Choose Outer Borders in LR/Mogrify Post Process Actions Box then click Insert. Set the Mogrify Path in Mogrify Configuration.
- Pick the color, size, etc of the borders as desired.
- Choose Text Annotations in LR/Mogrify Post Process Actions Box then Click Insert.
- Add your text annotations and uncheck ‘Add annotation before outer borders are applied’.
- Tweak any other settings such as font name, size, color, inset and position.
- LR2 users choose Graphical Watermarks from the LR/Mogrify Post Process Actions Box and set all appropriate options.
- LR3 users can use the new Watermarking option if you would like a text or graphical watermark on the image.
Let’s see your results in the FroForum!