
Gritty Photoshop Portrait Retouching Tutorial
As many of you know I spend almost no time in Photoshop retouching any of my photos. I primarily do all my tweaking inside of lightroom and leave it at that.
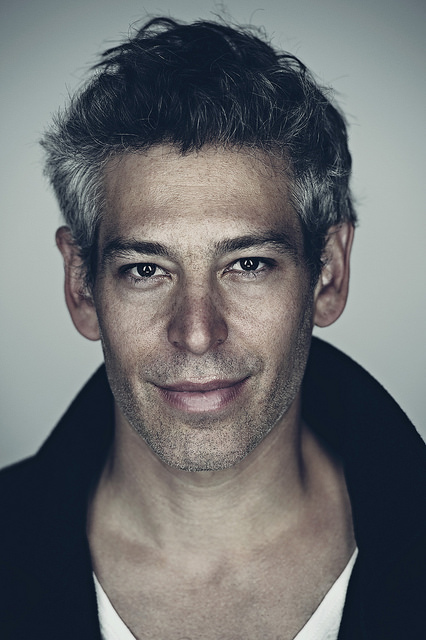
Just because that is how I handle editing my own portraits does not mean that is the only way. I reached out to my friend Nathaniel Dodson who runs Tutvid.com to see what he could do with one of my files. I sent him over a headshot I took of Matisyahu while in my loft just to see what direction he would take it.
Click Here to see my Edit of this image done in Adobe Lightroom.
I am so amazed at all of the different actions and changes you can put one image through. I guarantee if you were to attempt to edit this RAW file you would come out with a different result. What one person thinks is a killer edit someone else may not agree. But, in the end you will not please everyone, some people will like it others may not.
The great thing about art is it is subjective, it’s in the eye of the beholder. I think there is so much to learn in this video, so many things I have never considered myself when it comes to editing portraits.
Below you will find the step by step process that Nathaniel took to get to his final image.
Welcome folks! I’m Nathaniel from over at tutvid.com Today in this tutorial we’ll use
a bunch of Photoshop’s features to transform a simply lit portrait headshot into a gritty
photograph with beautiful tones and edges sharper than a double-edged
sword.
We’ll touch up the skin and build a gritty tone using Adjustment Layers in Photoshop. I am using Photoshop
CS6, but you should be able to use much older versions of Photoshop as well.
1. Open RAW, Kill Contrast
The process all begins with a great RAW image. Here we have an image shot with a D4 which is
front lit with several lights. We’re going to process this through Adobe Camera RAW and
Photoshop. Grab the RAW file and open it in Camera RAW. Check out my settings here; I am
reducing contrast and boosting the blacks and shadows. We’re going to pour contrast back in
selectively later on.
2. Open Image as Smart Object
Hold down your Shift key and hit the “Open Object” button. This opens our image as a Smart
Object.
3. Back to Camera RAW
Look to your Layers panel and right click on the layer and choose “New Smart Object Via Copy”.
Double click the layer thumbnail for our duplicated layer here. This will open the image in
Camera RAW again.
4. Black and White Process
Choose the HSL/Grayscale tab in Camera RAW and tick on the “Convert to Grayscale” option. I
am going to boost the luminosity of the Reds and reduce the Oranges and Yellows. You can see
how this is going to make his face look very dirty. Hit the “OK” button to commit the changes.
5. Overlay + Kill Contrast
Set this layer to the blend mode “Overlay”. There is too much contrast here so double click on
the layer thumbnail and reduce the highlights and whites and maybe even dump in some clarity.
Commit the changes by hitting “OK”.
6. Blemishes Clean Up
Create a new layer and name it “Blemishes” and grab the Healing Brush Tool (J) and look to the
control bar and choose “Current and Below” from the Sample drop down menu. Use your Alt/Opt
key and sample areas of skin and clothing and clear away the blemishes you can see. With a
weathered looking guy such as this, we don’t want to get rid of all the blemishes. This is no
beauty model, we don’t want that ultra refined, perfect looking skin.
7. Highlights in Eyes
Adding some depth to the eyes is a fantastic way to immediately add a sense of life to the
subject’s eyes. We’re going to do this with a few strokes of the Brush Tool (B). Create a new
layer and name it “EyePopLight”
and the grab the Brush Tool (B) and use a small, hardedged
brush to paint with white over the little highlights you see in his irises.
8. Shadows in Eyes
We’re going to repeat that last step, but this time we’re going to name our layer “EyePopDark”
and use a small brush painting with black. TIP: Life will be much easier as far as finding the
shadows if you shut off the light layer while painting the black lines.
9. Blur and Blend
Turn both eye pop layer on and choose the light layer and go Filter>Blur>Gaussian Blur. Choose
a setting with this blur that softens up the lines until they look more like little wisps of light. Do the
same for the dark layer. Set each layer to the blend mode “Overlay”. This will increase both the
color and contrast in the actual eye.
10. Large Blemishes
Before we begin our gritty toning, I want to soften up some of the larger blemish areas that will
end up looking far too dark in the final image (deep shadow or weathered lines on the face will
appear far darker than the rest of the skin tones.) Create a new layer and name it “Large
Blemishes” and grab the Healing Brush (J) again. Use a large healing brush and paint large
swaths to roughly cover large blemish areas. Simply reduce this layer to an opacity of about
50% to fade those blemishes away a bit.
11. Curves Adjustment Layer
The first step will come in the form of a Curves Adjustment Layer which we will use to begin the
toning process. TIP: If you see an image that you like at any point in this toning process, keep it!
Use the screenshots here to see how I am working with the RGB selection in the drop down
menu as well as the Red, Green, and Blue channels as well. Try to mimic what I am doing and
tweak until your image looks just right (every photo is different.)
12. Kill Contrast and Lighten
We’re going to prepare the image to be able to take on a combination of a bunch of darkness as
well as some serious contrast by using a Levels Adjustment Layer to kill off contrast and boost
the brightness of this photo. In addition, I am going to infuse some blues and cyans into this layer
by adjusting the lower black and white handles in my Red and Blue channels. Check out the
screenshots here.
13. Merge and Multiply
Use the secret hotkey Cmd/Ctrl + Shift + Alt/Opt + E to merge all of your visible layers to a new
layer. Set this layer to the blend mode of “Multiply”.
14. Vibrance and Clipping Mask
Add a Vibrance Adjustment Layer here and reduce the vibrance of the image by 20
or so. Then hold down your Alt/Opt key and hover over the edge of the layer in the Layer panel between the
Vibrance Adjustment Layer and the Multiply layer beneath it until you see the clipping mask icon
appear. Click to clip the vibrance layer to the layer below and preserve some additional skin
tones in your image.
15. Highlight Pop
Create a Selective Color Adjustment Layer and we’re going to focus on the White, Neutral, and
Black portions of the adjustment. Check out the screenshots here for my settings. TIP: Don’t be
afraid to push and pull sliders to see what looks great with your image too!
16. Contrast Pop
We’re going to use a Gradient Map Adjustment Layer to add some more contrast. You can see
that I am using a dark gray to white gradient and simply setting the layer to a blend mode of “Soft
Light”. I have also reduced the layer opacity to around 50%. Season your image with contrast
until it looks just perfect.
17. Tone Pop
Lastly, we’ll use a Channel Mixer Adjustment Layer to add some depth and perceived sharpness
within the tones in our image here. Tick on the “Monochrome” option and I typically try to push
the Reds and Greens up a little bit to really add light into the skin tones. Set this Adjustment
Layer to the blend mode “Multiply” and reduce the opacity until it looks just perfect.
18. Sharpen Big
Take a look at your image and adjust if your shadows are too dark (reduce one or more of the
Multiply layers) or if your image is too light (reduce the Gradient Map adjustment a little more and
increase the Multiply layers a touch too). Next, use the merge all layers to a new layer hotkey
(Cmd/Ctrl + Shift + Alt/Opt + E) once again to merge everything to a new layer. Desaturate this
layer by going Image>Adjustments>Desaturate. Go Filter>Other>High Pass and set it to
something like 40px or more. Set the layer to the blend mode “Soft Light” and reduce the opacity
to around 40%.
19. Sharpen Small (Details)
Repeat the last step, but this time use a High Pass filter of about 23px
or so.
20. Finishing Touches!
I added a few more Adjustment Layers to tweak the color to the final product that I have here.
Explore some of the different Adjustment Layers that we’ve used here to create an image that is
something you love.