
Canon PIXMA Pro 10 REVIEW
I used to think I’d never own an inkjet printer for printing my photos, believing that a solution for the home would never match a “real” lab print. Well, I can honestly say that I’ve had a bit of a change of heart recently with my introduction to the Canon Pixma Pro 10 inkjet printer.
When Canon asked me if I would like to review the Pixma Pro 10, I agreed, as long as they sent me enough ink and paper to properly run some real world tests. I was always under the impression that the ink was way too expensive and the added cost of purchasing paper made it an easy option to order my prints online. Despite my newfound respect for some at-home printing solutions, inkjet printers aren’t perfect, and I will break down their pros and cons in this full in-depth review.
First things first, lets take a look at the costs involved with owning this inkjet printer, which alone will run you $700 at most retailers (including Allen’s Camera.) You’ll have to seriously consider how many lab prints you could make elsewhere for $700. Other costs include the ink, which runs $14.99 for each cartridge, and you’ll need 10 cartridges to keep this bad boy up and running. The printer comes with a full assembly of ink right out of the box.

You also have to consider what paper (manufacturer, weight, size, etc.) you are going to purchase. There are a lot of companies that make inkjet paper, but for this review I used the Canon Pro Luster 13×19 inch. The Pixma Pro 10 can print paper up to 13×19 inches at full bleed, which means it will use the entire paper surface and not leave a white border. Since I do not crop my work, I only printed 12×18 sized images on the 13×19 sheet of paper.
Unboxing
The first thing you‘ll notice when taking this printer out of the box is how heavy it is. Personally, I like a little weight to things in an age when everything feels rather light and disposable.The printer feels sturdy and built to last. If I am dropping $700 on a printer, I would certainly like to get a good amount of time and use out of it.
Setup
There are two ways you can connect the printer to the computer: USB and WiFi. I was never able to get the printer to connect to my Mac via WiFi, but it’s so easy to plug it into a USB port that I just ended up connecting it the old fashioned way.
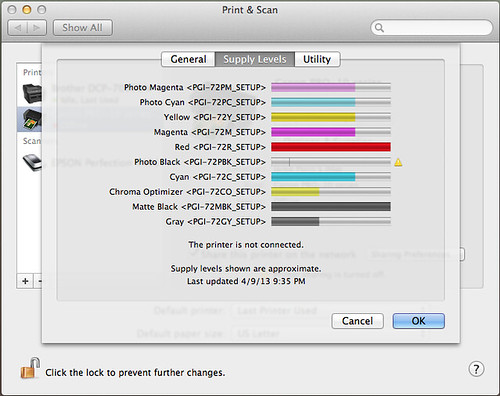
Installing the 10 inkjet cartridges is as simple as matching the little stickers on the printer and cartridge. There are even a series of small red lights that appears to let you know that the cartridges have been installed correctly.

Printing
I’m often asked if I color-calibrate my iMac screen and the answer is “no.” I have never put a color calibrator on my screen and did not do so before printing out my test prints.
One thing I did do was download the ICC profiles for this printer. ICC profiles control the color output to give you what’s supposedly the best color prints. It is a good idea to download and use color profiles when they are supplied for you.
I chose to print my images out of Lightroom using the included printer plugin from Canon. For someone like me who has never printed from home, I must say it was a very straightforward process. I made sure I selected what type of paper I was using, and what quality I wanted and pretty much hit print. All of the information you need to decide on these options are right there in the plug-in.
Print Times
You have different options like “standard” and “fine” print quality. From what I am told, printing it on “fine” does not use more ink, but it does take longer to print. In my timed printer tests on “fine” it took 15 minutes to print a full color/black and white 13×19 image. When the same image was printed on “standard,” it only took five minutes to print.
It’s pretty hard to tell the difference between the two prints, but it can be noticeable. In a sample print of a soccer player, I could see slight color differences and a slight difference in quality in certain portions of the print. It’s important to point out, however, that I was intentionally being critical of the prints and could really only see these differences from a few inches away. If you were to stand back a few feet, there is pretty much no way you would be able to tell which print was done on standard vs fine.
My suggestion is to always print on “fine” unless you really need to get your print out the door. I could see printing on “standard” if you are an event photographer selling prints on the spot. In that situation, it comes down to speed because the client would be hard pressed to tell the difference.
Print Cost
Print costs have always been one of the reasons I’ve never jumped at owning my own printer. I have come to realize that the cost difference between inkjet prints and lab prints are pretty much the same when you don’t take the initial cost of the printer into consideration.
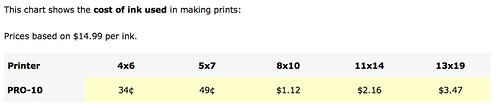
Red River Paper was nice enough to send me out some inkjet paper to test in the future and they spent a good hour on the phone educating me on all things inkjet printing. They have a breakdown on their site showing you the costs of each print that comes from the Pixma Pro 10. Take a look at the diagram below to see the actual ink costs per print. For a full run down of how they came up with these costs, please click here.
When you add in the cost of paper, you see that the smaller prints end up being more expensive to print at home. As you start to get into larger prints like 13×19 the costs for inkjet are roughly the same as the lab print.
In my printing tests, I ran 16 full coverage 13×19 prints before needing to change only one cartridge. I have since printed a few more and have yet to come close to needing to change any more. Seeing the costs put side by side was really eye-opening. I always felt like inkjets were far more expensive to operate but after my tests they are very comparable to lab prints.
Print Quality
This is what most of you have been waiting to read. The print quality is fantastic across the board. I have not seen colors get so boomy from any print let alone an inkjet in a long, long time. The blacks of the inkjet prints are fantastic and the color range is incredible. Canon tells us in ideal situations, a print should last a lifetime. Of course I have no way of testing this out, so I will have to take their word for it.
Keep in mind that there are many different paper brands and types out there. You have glossy, luster, metallic, fine art, and so on. Depending on what type of image you are printing, you will need to decide what type of paper will be best. In most cases for me, I love luster. The reasoning behind that is that it’s not glossy, but it’s also not flat – it still has a sheen, without showing fingerprints.
Black And Whites
I made sure to print some black and white images to compare from both the Pixma and the lab. You know that I love making my black and whites go BOOM and that is exactly what the printer does more so than the lab. The depth of the blacks can not be matched by the lab as you are adding black inks to the paper. You can see this in side by side comparisons where the blacks are just so much thicker from the Canon PIXMA.
What allows this printer to do such great black and whites is the fact that it has extra black inks and grey inks to allow you to get the best black and whites possible.

Inkjet vs lab prints.
The true test was to place the inkjet prints next to lab prints from AdoramaPIX.com and let people try and discern the difference between the two. I took the prints over to Allen’s Camera and their staff had a tough time being able to tell me which prints were which and if any were better.
There are very few differences between the sample prints I made. In some cases the inkjet looks like it has more vibrant colors but on the same image, the lab print may have something else that looks better. I personally had trouble figuring out which prints where which when they were all mixed up.
I think what it came down to was if you did not have the prints side by side, you would have been more than happy with either one. Sure, there are some minor differences between the inkjet and the lab but I don’t think they were blatant enough to crown one the winner over the other.
Conclusion
So does my position that I’d never own an inkjet printer still hold true? The answer to that is a BIG NO. I fell in love with the quality of this Canon Pixma Pro 10.
If you are trying to figure out if this inkjet printer is for you, you have to ask yourself a few questions: How quickly do you need your prints and how often are you going to use it? If you do not do a lot of printing, then I would stick with ordering prints from a lab. If you are constantly pumping out prints for clients or printing on location at events, then the initial expense may be worth it.
You have to keep in mind that right off the bat, you will be spending $700 plus paper to start with this printer. For $700 you could order in a TON of prints from AdoramaPIX.com. But if you are making money off your photos and have a need for speed, you can’t go wrong with owning this printer. Having the ability to do a photo shoot and let your client leave with a professional print is going to be great for business.
Here are some final thoughts. For me 13×19 is not big enough. I like to make BIG ASS PRINTS. Sure the prints are fantastic at 13×19 but there is something about seeing your work printed larger. You can purchase larger inkjet printers but you will be looking at dropping thousands of dollars right off the bat. I would suggest if you are looking to make BIG ASS PRINTS, you use a lab. But if you can justify having an inkjet at home, I would highly recommend you check out this Canon Pixma Pro 10.